Building a simple Authentication in Nextjs part 2. Sign up logic
This guide breaks down the logical sequence of information flow, step-by-step algorithms, and security considerations required to build a custom authentication system from scratch Part 2


Building a Secure Signup Flow in Next.js
To build our signup endpoint, we have to think critically and consciously about security and edge cases.
In this guide, we will use Node.js's crypto module to generate verification tokens because it provides cryptographically secure random values, unlike the usual Math.random(). Other alternatives include UUID and CUID.
We will also use bcryptjs instead of bcrypt. This is because bcryptjs is written entirely in JavaScript, is more compatible with Next.js environments, and is generally easier to deploy on platforms like Vercel. The tradeoff is that bcryptjs is slower than the native bcrypt package.
Setting Up a Route Handler
In Next.js, you can create an API route by creating a folder and adding a route.ts file:
export async function POST(req: Request)
req represents the incoming request. In this case, it comes from a form submission. After a user fills out a form and clicks submit, the submitted data becomes part of the request received by the server.
Validation Logic
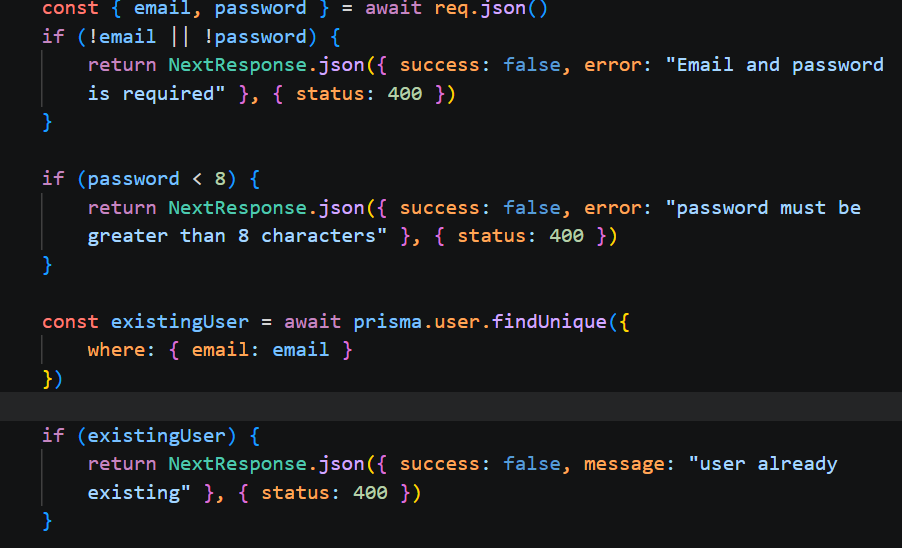
Next, extract the required fields and perform server-side validation.
This ensures that only valid data gets stored in the database.
Some common validations include:
- Password length (a common minimum is 8 characters)
- Email format validation
- Checking for existing users
- Regular expression checks where necessary
Password Hashing
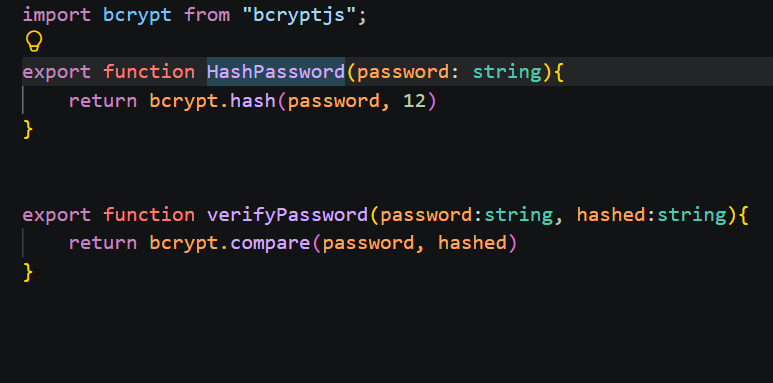
Never store plain-text passwords in your database.
Instead, create a helper function that hashes passwords before storage.
Creating the User
After validation and password hashing, create the user record.
const passwordHash = await hashPassword(password);

const verificationToken = crypto
  .randomInt(100000, 1000000)
  .toString();

const user = await prisma.user.create({
  data: {
    email,
    passwordHash,
    isVerified: false,
    verificationToken,
    expiresAt: new Date(
      Date.now() + 24 * 60 * 60 * 1000
    ),
  },
});
The verification token is a 6-digit code generated using the crypto module.
The expiration time is set to 24 hours from the moment the account is created.
Remember that database operations can fail. Always use a
try/catchblock to handle errors safely.
Sending a Verification Email
After creating the user, send a verification email to the user's email address.
Some popular email libraries and services include:
Nodemailer
Resend
SendGrid
Mailgun
For this guide, we will use Nodemailer.
Nodemailer is a Node.js library used for sending emails.
The process is simple:
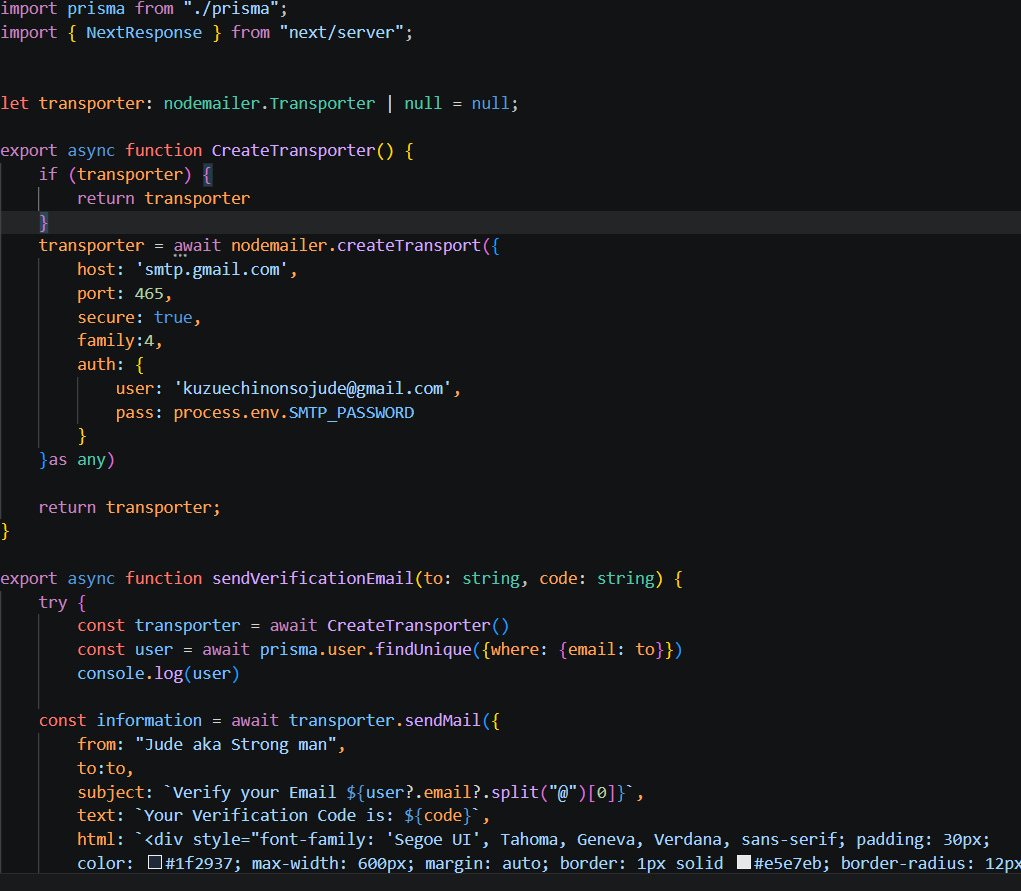
- Create a transporter
- Use the transporter to send the email
Background Knowledge
What is SMTP?
SMTP (Simple Mail Transfer Protocol) is the standard protocol used to send emails.
Your application sends email requests to an SMTP provider, and that provider routes the emails to the intended recipients.
Examples of SMTP providers include:
- Google (Gmail SMTP)
- Microsoft (Outlook SMTP)
- SendGrid
- Mailgun
What is a Transporter?
A transporter is the Nodemailer object responsible for sending emails.
What is Ethereal?
Ethereal is a fake email service designed specifically for developers.
You can use Nodemailer to create a temporary test account instantly:
const testAccount =
  await nodemailer.createTestAccount();
For this guide, however, we will use Gmail SMTP instead.
Installing Dependencies
npm i nodemailer @types/nodemailer
Creating the Transporter
We create the transporter once and reuse it throughout the application to avoid unnecessary resource consumption.
let transporter: nodemailer.Transporter | null = null;

export async function createTransporter() {
  if (transporter) {
    return transporter;
  }

  transporter = nodemailer.createTransport({
    host: "smtp.gmail.com",
    port: 465,
    secure: true,
    family: 4,
    auth: {
      user: "kuzuechinonsojude@gmail.com",
      pass: process.env.SMTP_PASSWORD,
    },
  } as any);

  return transporter;
}
Configuration Breakdown
host
host: "smtp.gmail.com"
The SMTP server address.
port and secure
port: 465,
secure: true
When using:
Port 465 → secure: true
Port 587 → secure: false
family
Sometimes you may encounter the following error:
ENETUNREACH (Network Unreachable)
with an address similar to:
2a00:1450:4009:c0f::6c
This usually means Node.js is attempting to connect using IPv6, but your ISP or local network does not support IPv6.
Newer versions of Node.js often prefer IPv6 over IPv4 when resolving hostnames.
To force IPv4, add:
family: 4
This tells the underlying connection library to resolve and use only IPv4 addresses.
auth
auth: {
  user: "your-email@gmail.com",
  pass: process.env.SMTP_PASSWORD
}
useris your Gmail address.passis your Gmail App Password.
Getting Your Gmail App Password
- Go to your Google Account Security Settings.
- Enable 2-Step Verification.
- Open App Passwords.
- Generate a new App Password.
- Select Other and give it a name such as:
My Node App
- Copy the generated 16-character password.
- Use it as your SMTP password.
Your SMTP configuration will then use:
Host: smtp.gmail.com
Password: Your App Password
Important Note
Personal Gmail accounts have a sending limit of approximately 500 emails per day and are not suitable for production applications.
For production systems, consider services such as:
- Resend
- SendGrid
- Mailgun
- Amazon SES
Then send the Mail using the Transporter
const info = transporter.sendmail({
  from: "john does",
  to,
  subject: "verify your Email",
  text: "your verification code is ,
  html,
)

transporter.sendmail returns the metadata of the sent email
Complete Example
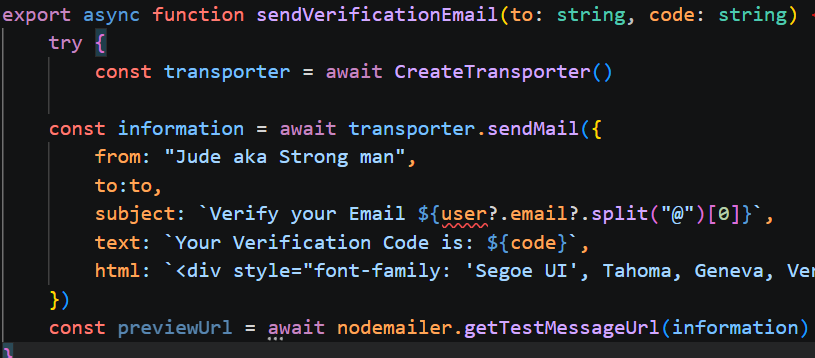
Ensure that you return a previewUrl so your server can send it back to the frontend when needed.
Comments, contributions, and corrections are welcome.
Comments (0)
No comments yet. Be the first to share your thoughts.