Resend Explained: Modern Email Delivery for Next.js Applications
Explore how Resend simplifies transactional email in modern web applications while learning the essential concepts of serverless computing, domains, DNS, email verification, and React Email.


Getting Started with Resend in Next.js
Today in this article, I will be explaining Resend, the concepts surrounding it, and how to use it in your application in simple steps.
Resend is a full email service provider, which uses HTTP POST requests. It is a newer email platform built specifically for modern frameworks (like Next.js, Remix, and Node) and serverless environments.
For production, you need to own your own domain, but for development Resend provides us with a special sandbox and their default domain, onboarding@resend.dev. You can only send emails to the single email address you used to sign up for Resend.
You cannot send an email from your personal email (e.g. @gmail.com) because you do not own the domain. For you to be able to send emails, you must own your own domain.
To send emails to your users from a professional address (like support@yourwebsite.com), you must:
- Buy a domain from a registrar like Namecheap or GoDaddy.
- Connect that domain to Resend by adding a few DNS records to prove that you own it.
- Once verified, you can send emails to any email address in the world.
Important Concepts
Stateful
A stateful system has information persisted across requests. Here the server keeps running and connections are persisted.
Example: Express server.
It is like making a phone call.
Stateless
Information is not retained across requests. Data is usually stored externally in a database or object storage.
Examples: Next.js, Vercel.
It is like sending a text message. You do not keep a live connection open with the receiver.
Serverless Platforms
Here, servers are managed for us by cloud providers; we only use their services.
A serverless platform still runs our code on servers, but the cloud provider owns, manages, scales, patches, and operates those servers for us, so we only write and deploy our application code.
Serverless platforms are always stateless.
Domain
A domain is a human-readable name that maps internet resources through a Domain Name System (DNS).
A domain is registered through a domain registrar. When you register a domain, you are leasing the exclusive right to use that namespace for a specified period, typically one year at a time. You do not permanently own the domain; you retain control by renewing the registration.
Owning the domain gives the domain administrator authority to create addresses such as:
admin@staff.comsupport@staff.com
However, domain ownership alone does not provide email functionality. You need an email hosting provider, which hosts the mailboxes associated with your domain.
DNS
DNS resolves domain names into their corresponding IP addresses.
Let's examine:
www.staff.example.com
com— Top-Level Domain (TLD), managed by registries.example— Second-Level Domain (SLD), the unique name that you registered.staff— Subdomain. Subdomains allow services to be logically separated while remaining under the same registered domain.
Email Domain
An email domain is simply a domain that has been configured to send and/or receive email.
Before an email delivery provider allows you to send emails from your domain, it must verify that you control that domain.
This is typically accomplished by adding DNS records provided by the service.
Email Hosting Provider
A service that hosts mailboxes and manages inbound and outbound mail infrastructure.
Email Delivery Service
A platform optimized for sending transactional or marketing emails at scale.
Domain Verification
The process of proving administrative control of a domain by publishing provider-specified DNS records.
Email Authentication
Standards such as SPF, DKIM, and DMARC that validate the authenticity and integrity of email messages.
Using Resend
Using Resend involves the following steps.
Resend provides us with a default domain for testing our application: onboarding@resend.dev.
The catch is that you can only send email to the single email address you used to sign up on the Resend website.
Step 1: Install the Dependencies
Install Resend:
npm install resend
Instead of writing unreadable inline HTML tables, Resend enables you to compile modern React components into HTML.
If you want to use React to design your email templates, install:
npm install @react-email/components @react-email/render
Step 2: Get an API Key
Go to resend.com and create an account.
Go to the API Keys section in your dashboard and click Create API Key.
Copy the key and add it to your .env or .env.local file.
Step 3: Create an Email Template
Create your email template inside your components folder.
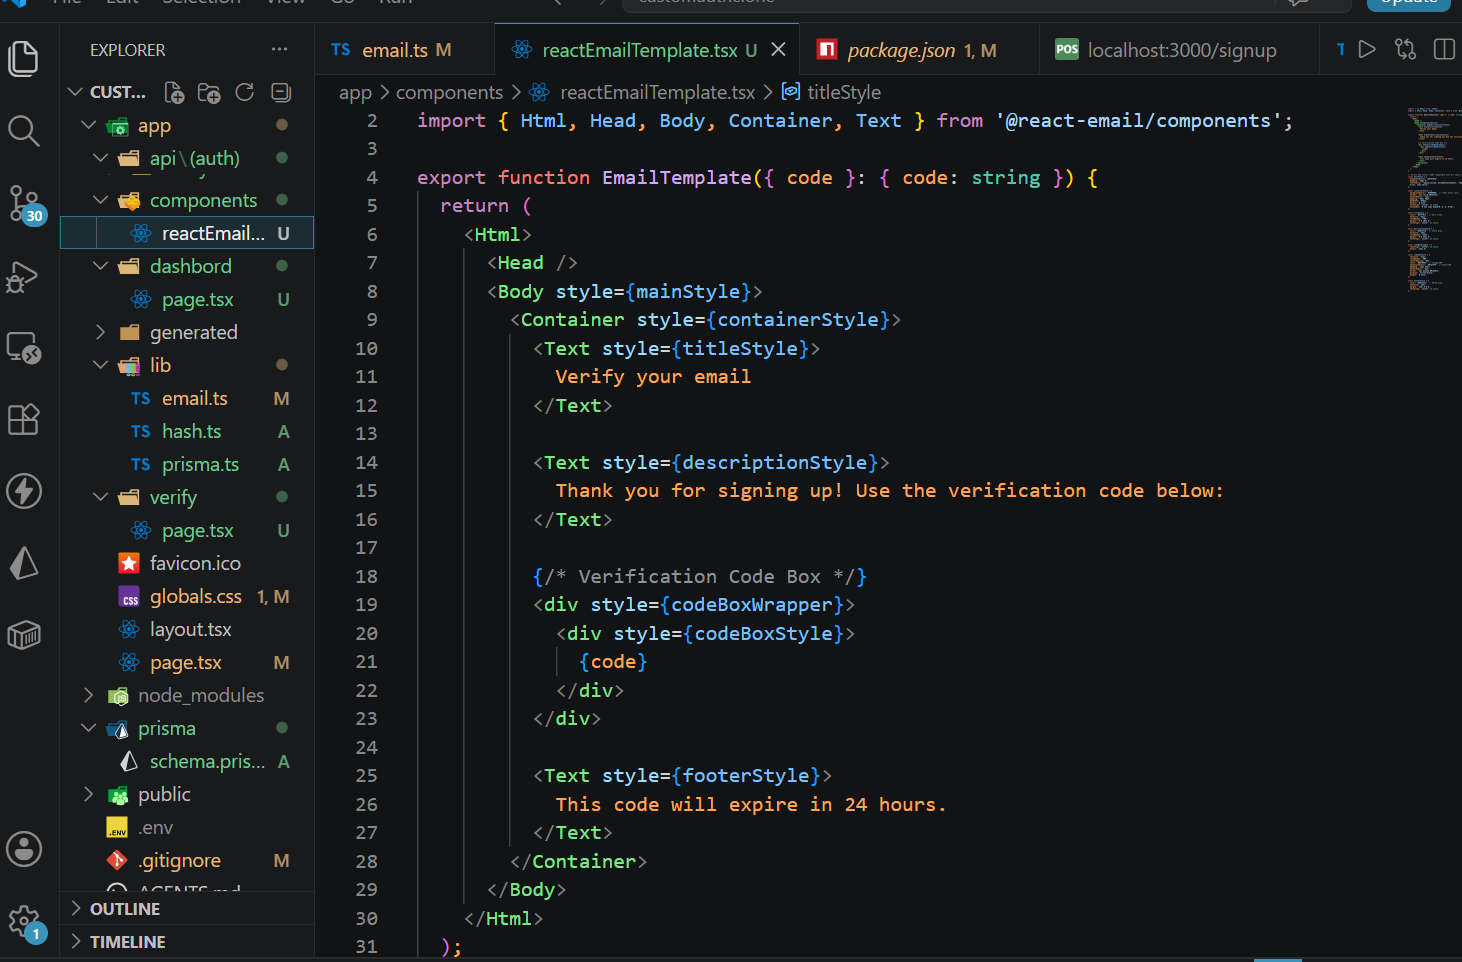
Step 4: Send the Email Using Resend
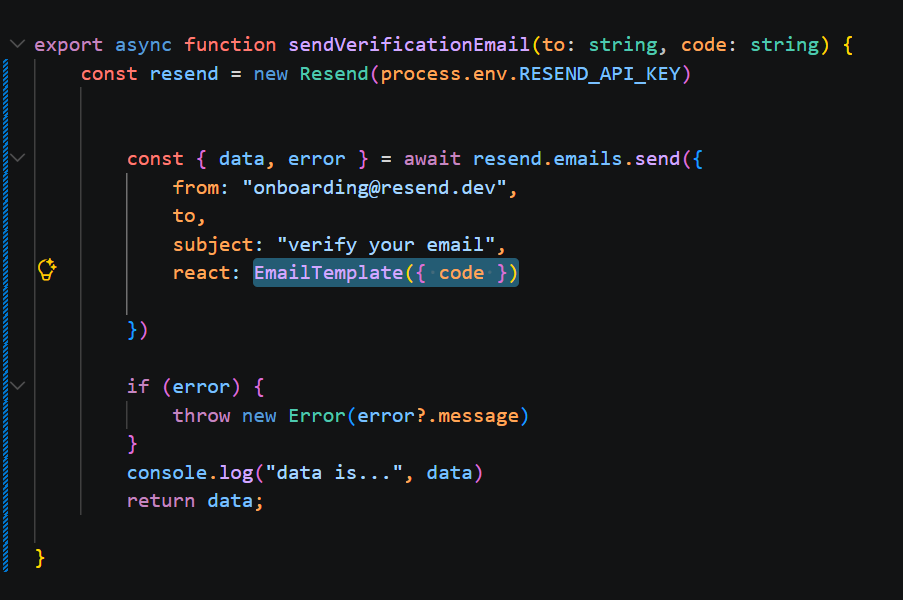
If the email is successfully accepted by Resend's servers, error will be null and data will contain the unique ID of the sent email.
Important Note
To guarantee that your email looks exactly the same in every single inbox, you must use traditional inline styles.
style={{ ... }}
Comments (0)
No comments yet. Be the first to share your thoughts.