Building Production‑Ready Two‑Factor Authentication with TOTP in Next.js
Learn how TOTP-based 2FA works from the ground up using otplib and qrcode

Building Two-Factor Authentication (2FA) with TOTP in Next.js
Security is one of the most important aspects of building modern applications. Even if a user's password is compromised, we can still protect their account by requiring an additional form of verification before granting access.
This extra layer of protection is known as Two-Factor Authentication (2FA).
In this article, I'll explain, from the barest minimum knowledge, how we can add Two-Factor Authentication to our applications using TOTP, otplib, and qrcode.
Rather than jumping straight into the implementation, we'll first understand the concepts behind how everything works. Once the concepts are clear, implementing the code becomes much easier.
Table of Contents
- Basic Concepts
- What is TOTP?
- What is
otplib? - What is
qrcode? - How the Authentication Flow Works
- Generating the QR Code
- Verifying the First Authentication Code
- Future Login Flow
- Disabling Two-Factor Authentication
- Complete Implementation
Basic Concepts
Before writing any code, let's understand the technologies involved.
What is TOTP?
TOTP (Time-Based One-Time Password) is an algorithm that generates a short-lived numerical code using:
- A shared secret
- The current time as a moving factor
It is the technology behind authenticator applications like:
- Google Authenticator
- Microsoft Authenticator
- Authy
The generated code usually changes every 30 seconds.
Unlike email OTPs, the server does not generate and send these codes. Instead, both the server and the authenticator application independently calculate the exact same code using the shared secret and the current time.
What is otplib?
otplib (One-Time Password Library) is a JavaScript library that implements the TOTP algorithm.
It is responsible for:
- Generating a secret
- Creating the
otpauth://URI - Verifying authentication codes
- Generating TOTP codes
Authenticator applications do not understand the raw secret alone. They expect an otpauth:// URI, which is why otplib provides the keyuri() function.
What is qrcode?
qrcode is a general-purpose JavaScript library that converts text into a QR code image.
QRCode.toDataURL("text");
For Two-Factor Authentication, we pass the generated otpauth:// URI into QRCode.toDataURL().
Without this QR code, users would have to manually type a very long authentication URI into their authenticator application, resulting in a poor user experience.
Authentication Flow
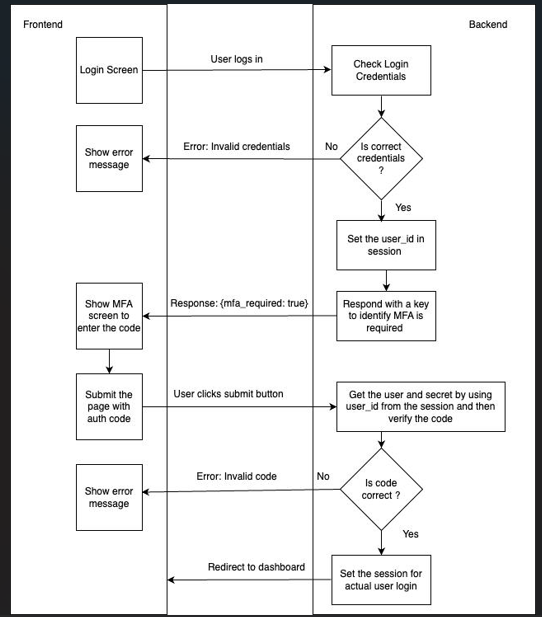
To support Two-Factor Authentication, we add two additional columns to our User model.
| Field | Purpose |
|--------|---------|
| twoFactorSecret | Stores the user's shared secret |
| twoFactorEnabled | Indicates whether Two-Factor Authentication has been enabled |
Setting Up Two-Factor Authentication
The user must already be authenticated before they can enable Two-Factor Authentication.
When the user clicks Enable 2FA, our server performs the following steps:
- Generate a unique secret.
- Create an
otpauth://URI. - Convert the URI into a QR code.
- Store the secret.
- Return the QR code to the frontend.
Step 1 — Generate the Secret
const secret = authenticator.generateSecret();
Every user receives their own unique secret.
Step 2 — Generate the Authentication URI
const serviceName = "Chukwunonso App";

const otpAuthUrl = authenticator.keyuri(
  user.email,
  serviceName,
  secret
);
Understanding keyuri()
authenticator.keyuri(
  accountName,
  issuer,
  secret
);
 `accountName` | Usually the user's email address
`issuer`  The name of your application
 `secret`  The shared secret used to generate TOTP codes
---

## Step 3 — Generate the QR Code

```ts
const qrCodeDataUrl = await QRCode.toDataURL(otpAuthUrl);
This QR code is returned to the frontend and displayed for the user to scan.
Step 4 — Store the Secret
After generating the QR code, store the secret inside your database.
Important
Do not enable Two-Factor Authentication immediately.
A user might close the browser before scanning the QR code.
Instead, store the secret and wait until they successfully verify their first authentication code before setting:
tstwoFactorEnabled = true;
Finally, return the generated QR code to the frontend.
What Happens After Scanning?
Once the user scans the QR code, the authenticator application extracts everything it needs from the otpauth:// URI.
That includes:
- The application name (Issuer)
- The account name
- The shared secret
The authenticator application securely stores the secret on the user's device.
How TOTP Actually Works
This is the most important concept in the entire authentication process.
Every 30 seconds, both the server and the authenticator application calculate a six-digit authentication code using:
- The shared secret
- The current time
Shared Secret
      +
Current Time
      │
      ▼
TOTP Algorithm
      │
      ▼
  483921
The important thing to understand is that the server and the authenticator application never communicate directly.
The server never asks Google Authenticator for the correct code.
Likewise, Google Authenticator never asks your server what the current code should be.
Instead, both independently perform the exact same standardized TOTP calculation using:
- The same shared secret
- The same current time
- The same TOTP algorithm
Since both sides use identical inputs, they both arrive at the exact same authentication code.
The authentication code itself is never stored inside the database.
Verifying the First Authentication Code
After scanning the QR code, the user enters the generated authentication code.
The server first checks that the user has already started the setup process.
if (!user.twoFactorSecret) {
  return NextResponse.json(
    {
      success: false,
      message: "2FA authentication has not been initiated",
    },
    { status: 400 }
  );
}
Next, we verify the submitted code.
const isValid = authenticator.verify({
  token: code,
  secret: user.twoFactorSecret,
});
The verify() function accepts two parameters:
token— The authentication code entered by the user.secret— The shared secret stored in the database.
If the verification fails:
if (!isValid) {
  return NextResponse.json(
    {
      success: false,
      message: "2FA code invalid. Scan the QR code and try again.",
    },
    { status: 400 }
  );
}
If the verification succeeds, we can finally enable Two-Factor Authentication.
await prisma.user.update({
  where: {
    id: session.user.id,
  },
  data: {
    twoFactorEnabled: true,
  },
});

return NextResponse.json(
  {
    success: true,
    message: "2FA authentication has now been enabled",
  },
  { status: 200 }
);
At this point, Two-Factor Authentication has been successfully configured.
Future Login Flow
The next time the user logs in, the authentication flow becomes:
- Verify the user's email.
- Verify the user's password.
- Check whether
twoFactorEnabledistrue. - Prompt the user for the authentication code.
- Verify the submitted code using the stored secret.
- Complete authentication.
Disabling Two-Factor Authentication
Disabling Two-Factor Authentication is much simpler.
We simply:
- Set
twoFactorEnabledtofalse. - Remove the stored secret.
await prisma.user.update({
  where: {
    id: user.id,
  },
  data: {
    twoFactorEnabled: false,
    twoFactorSecret: null,
  },
});

return NextResponse.json(
  {
    success: true,
    message: "2FA has been disabled successfully",
  },
  { status: 200 }
);
By removing the secret, the server no longer has the information required to verify future authentication codes.
Complete Implementation
Our implementation consists of three API routes.
app
└── api
    ├── setup
    │   └── route.ts
    ├── enable
    │   └── route.ts
    └── disable
        └── route.ts
Each route follows the Single Responsibility Principle, meaning it focuses on one task only.
1. Setup Route
Endpoint
GET /api/setup
Responsibility
This route:
- Verifies the user's session.
- Generates a unique secret.
- Creates the
otpauth://URI. - Generates the QR code.
- Stores the secret.
- Returns the QR code to the frontend.
import prisma from "@/app/lib/prisma";
import { cookies } from "next/headers";
import { NextResponse } from "next/server";
import { authenticator} from "otplib"
import qrcode from 'qrcode'

export async function GET() {
   try {
    const cookiesStore = await cookies()
    const sessionToken = cookiesStore.get("sessionToken")
    console.log(sessionToken)

    if(!sessionToken || !sessionToken.value){
        return NextResponse.json({
            success:false, message: "Not authorized"
        }, {status: 401})
    }

    const session = await prisma.session.findUnique({
        where: {sessionToken: sessionToken.value},
        include: {user: true}
    })

    if (!session || session.expiresAt < new Date()){
        return NextResponse.json({
            success:false, message: "unauthorized: invalid session or expired session"
        }, {status: 401})
    }

    const userId = session.user.id
    const user = await prisma.user.findUnique({
        where: {id: userId}
    })

    if (!user){
        return NextResponse.json({
            success:false, message: "Not found: user is not found"
        }, {status: 404})
    }

    const secret = authenticator.generateSecret()
    const serviceName = "chukwunonso app"
    const otpAuthUrl = authenticator.keyuri(user.email, serviceName, secret)

    //converting to qrcode
    const qrcodeDataUrl = await qrcode.toDataURL(otpAuthUrl)

    await prisma.user.update({
        where: {id: user.id},
        data: {
            twoFactorEnabled: false,
            twoFactorSecret: secret
        }
    })
    console.log("success activated 2FA mode")
    return NextResponse.json({
        success: true, message: "successfully activated 2FA mode", qrcode: qrcodeDataUrl, secret: secret
    },{status: 200})
   } catch (TwoFAerr) {
    console.log("server error:unable to setup 2FA",TwoFAerr )
    return NextResponse.json({
        success:false, TwoFAerr: "internal server error"
    }, {status: 500})
   }

}
2. Enable Route
Endpoint
POST /api/enable
Responsibility
This route:
- Verifies the user's session.
- Ensures setup has already started.
- Verifies the submitted authentication code.
- Enables Two-Factor Authentication.
import prisma from "@/app/lib/prisma"
import { cookies } from "next/headers"
import { NextResponse } from "next/server"
import { authenticator } from "otplib"

export async function POST(req: Request){
    try {
        const { code } = await req.json()
    if(!code){
        return NextResponse.json({
            success:true, message: "bad request: code is required!"
        }, {status: 400})
    }

    const cookiesStore = await cookies()
    const sessionObject = cookiesStore.get("sessionToken")

    if (!sessionObject || !sessionObject?.value){
        return NextResponse.json({
            success:false, message: "unauthorized: session is missing"
        }, {status: 401})
    }

    const session = await prisma.session.findUnique({
        where: {sessionToken: sessionObject.value},
        include: {user: true}
    })

    if (!session || session.expiresAt < new Date()){

        return NextResponse.json({
            success: false, message: "unauthorized: invalid or expired session"
        }, {status: 401})

    }

    const user = await prisma.user.findUnique({
        where: {id: session.user.id}
    })

    if(!user){
        return NextResponse.json({
            success: true, message: "Not found"
        }, {status: 404})
    }

    if (!user.twoFactorSecret) {
        return NextResponse.json({
            success: false, message: "2FA authentication has not been initiated"
        }, {status: 400})
    }

    const isValid = authenticator.verify({token: code, secret: user.twoFactorSecret})

    if (!isValid){
        return NextResponse.json({
            success: false, message: "2FA code invalid, scan the qrcode and try again"
        }, {status: 400})
    }

    await prisma.user.update({
        where: {id: session.user.id},
        data: {
            twoFactorEnabled: true
        }
    })

    return NextResponse.json({
        success: true, message: "2FA authentication has now been enabled"
    }, {status: 200})
    } catch (error) {
        console.log("activating 2FA failed", error)
        return NextResponse.json({
            success: false, message: "internal server Error", error
        }, {status: 500})
    }
}
3. Disable Route
Endpoint
GET /api/disable
Responsibility
This route:
- Verifies the user's session.
- Disables Two-Factor Authentication.
- Removes the stored secret.
import prisma from "@/app/lib/prisma";
import { cookies } from "next/headers";
import { NextResponse } from "next/server";

export async function GET(){
  try {
        const cookiesStore = await cookies()
        const sessionObject = cookiesStore.get("sessionToken")

        if (!sessionObject || !sessionObject?.value){
            return NextResponse.json({
                success:false, message: "unauthorized: session token  is missing"
            }, {status: 401})
        }

        const session = await prisma.session.findUnique({
            where: {sessionToken: sessionObject.value},
            include: {user: true}
        })


    if(!session || session.expiresAt < new Date() ){
        return NextResponse.json({
            success: false, message: "unauthorized: invalid or expired token"
        }, {status: 401})
    }

    const user = await prisma.user.findUnique({
        where: {id: session.user.id}
    })

    if (!user){
        return NextResponse.json({
            success: false, message: "Not Found"
        }, {status: 404})
    }

    await prisma.user.update({
        where: {id: user.id},
        data: {
            twoFactorEnabled: false,
            twoFactorSecret: null
        }
    })

    return NextResponse.json({
        success: true, message: "2FA has been disabled successfully"
    }, {status: 200})

  } catch (error) {
    console.log("deactivated 2FA successfully")
    return NextResponse.json({
        success:false, message: "internal server error"
    }, {status: 500})
  }
}
Final Thoughts
The most important concept to understand is this:
The server and the authenticator application never communicate directly.
Instead:
- The server stores a shared secret.
- The authenticator application stores the same shared secret.
- Both independently use the TOTP algorithm and the current time to generate the same six-digit authentication code.
- The server simply compares the submitted code with the one it calculates itself.
Once this mental model clicks, implementing TOTP-based Two-Factor Authentication becomes much easier.
I hope this article helped you understand not just how to implement 2FA, but why it works.
Comments (0)
No comments yet. Be the first to share your thoughts.